

The end result. A waterfall-like flow that comes out of a wide nozzle.
So what do you do when your shower-head sucks so bad that the best you can do is screw in a bottle cap into your existing shower-head in the hopes that it will disperse water better? Make your own of course! Having recently gotten my 3D printer to (somewhat) work, I decided that this was a good mini project to lean the ins and outs of printing with.
The current design of the shower-head I have now is a simple nylon insert with the aforementioned bottlecap helping to spread the water into a spray rather than a stream. rather than design the whole shower-head, complete with threads (which I doubt my printer can do with any degree of accuracy), it became clear that replacing the bottle cap disperser was far easier and more reliable a method to print out the perfect shower head.
Before starting though I needed to know what kind of shower-head I needed. I knew i wanted a shower-head that was unique in some way. And I had a love for laminar flow, a condition in which water is made to flow in a single direction giving it a smooth glasslike appearance (think jumping fountains). I also considered how that kind of water flow would provide me with a massage effect that I imagine to be quite nice.
My consideration at this point was the accuracy of my 3D printer in printing out the threads and the accuracy of my measurements of the threads (I didn't have a caliper at the time so accurate measurements at this level would be a little hard). I decided that the easiest way would be to use the second method and screw the new head on. I felt this would work well for a couple of reasons. Firstly, there was a larger tolerance for inaccuracies. Being new to 3D printing at the time, I wanted there to be wiggle room in order for me to adjust and fine tune the design. Secondly, it was easier and less likely to damage any preexisting components as I did not have to remove the existing pipe connections which were fastened rather tightly.
Preface Into Laminar Flow
As I mentioned before, I have always loved laminar flow and wanted to incorporate this into my shower-head design. But what is laminar flow? Laminar flow has to do with a fluid (water or air) flowing in a straight parallel layers with no disruptions. Ever gently run the water in your sink to where the stream becomes clear and glasslike? That is an example of laminar flow. With water flowing all in the same direction with minimal turbulence, the stream of water.
The 3D Printing Process
For this project I utilized my new 3d printer, an Anet A8. As a Chinese version of the popular RepRap Mendel, it had a pretty good lineage behind it and a strong community due to its low price point. It did have some issues such as a lack of a way to tension the pulleys and somewhat questionable electronic hardware (prone to melting and overheating). But for $200 USD it is a good entry level solution for 3D printing.
My choice of filament was PLA plastic, mainly due to its less toxic fumes (living in an apartment means extractor fans would be necessary with ABS. With PLA I could just open the windows.) and its much lower melting point. The lower melting point meant less energy would be flowing through the components reducing the fire risk, an issue that has been discussed on many forums.
Attempt 1
For my first attempt, I looked towards mimicking the nozzles on jumping fountains. I had looked at other 3D printed designs online and most of them consisted of a stylized head that had standard rain-like water flows. These can feel great if you have a head that's large and water pressure/flow high enough to give you a true rain feel, but with the water pressures that student accomodations typically have, it was unlikely that I would get that result. A concentrated stream of water however, was far more likely to succeed in my mind. Because the flow would merely be uniformly directed into a single smooth stream, the amount of water required to achieve a satisfactory result was reduced.
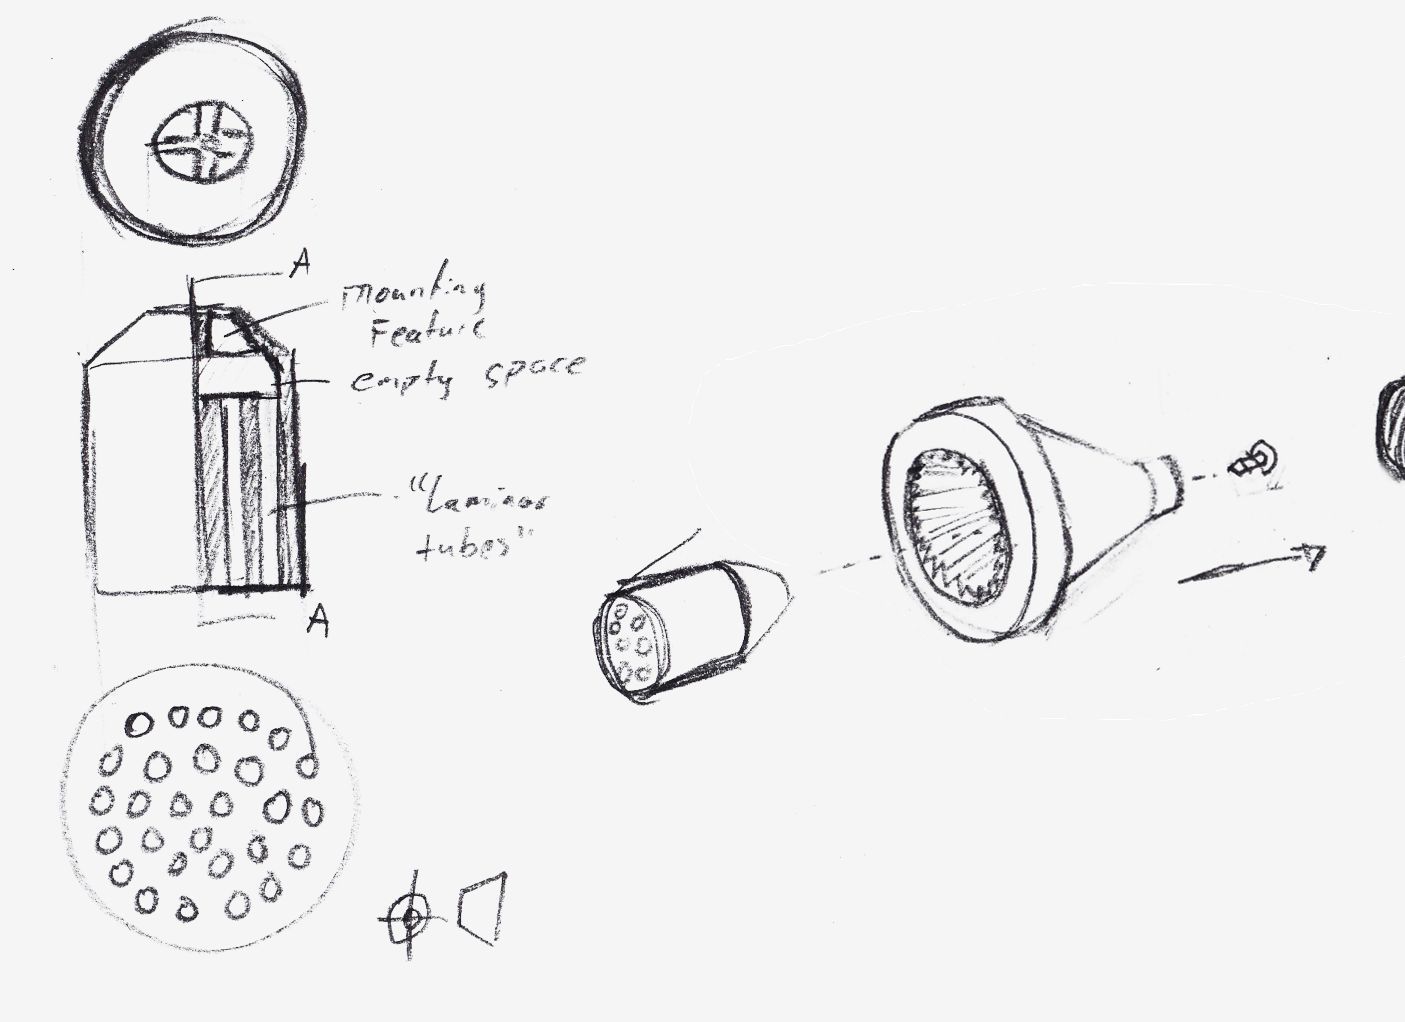
Inspiration for the first design came from the homebrewed solutions found on the internet for laminar flow nozzles. In these solutions, typically the design would incorporate a relatively large pipe filled with plastic drinking straws. The straws are oriented perpendicularly to the direction of flow with the pipe covered on both ends with an inlet/outlet nozzle on either side.
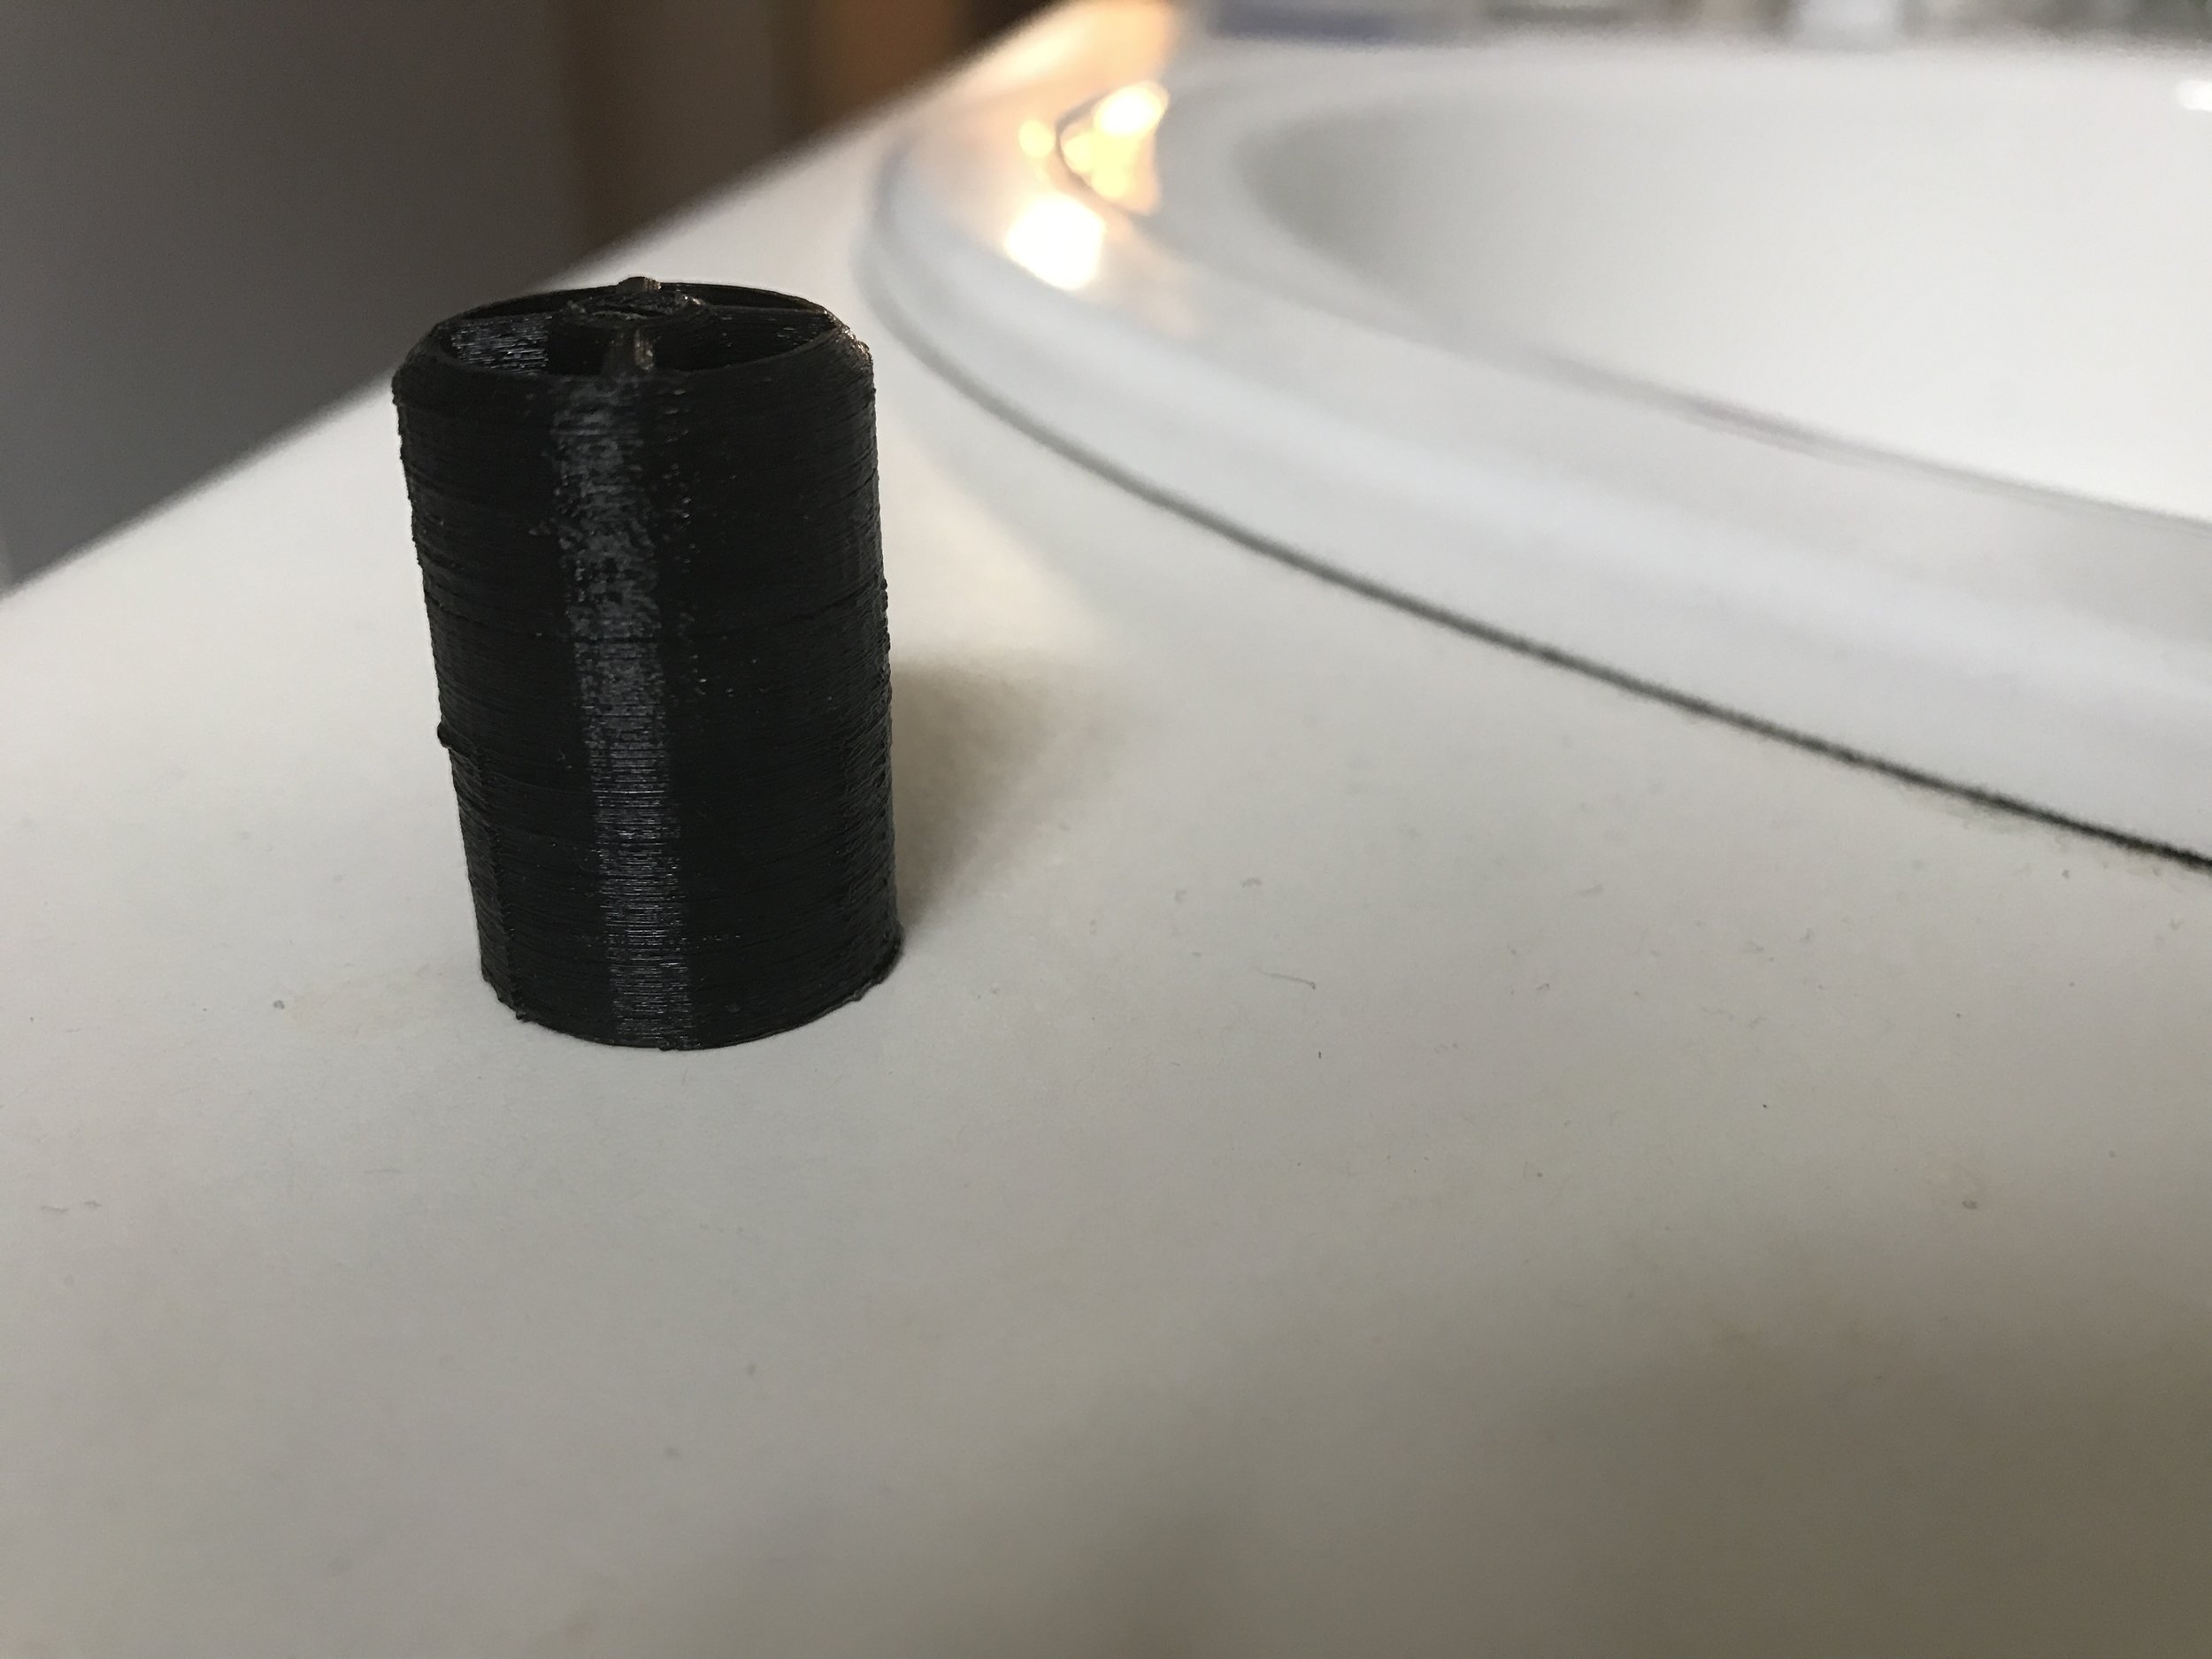
The first design was made to mimic this through 3d printing, eliminating the need for any assembly. Consisting of basically a cylinder with a series of small paralel holes, this first design was less than successful. The water flowed out of the nozzle in a rough chaotic stream. Unlike a true laminar flow nozzle, the flow was not smooth and glasslike. What it did manage to achieve though was a strong, intense flow similar to the massage functions on some commercial shower-heads. However, this flow was too strong and was unpleasant on the skin, rendering it unfit for this purpose.
The 3D printing process also resulted in an additional issues as the layers of the print created ridges in the flow tubes, disrupting the flow of water. Initially I suspected it was this that destroyed the main flow of the water along with the high pressure of the water in the building but as I will explore later, there were more factors in play.


Attempt 2
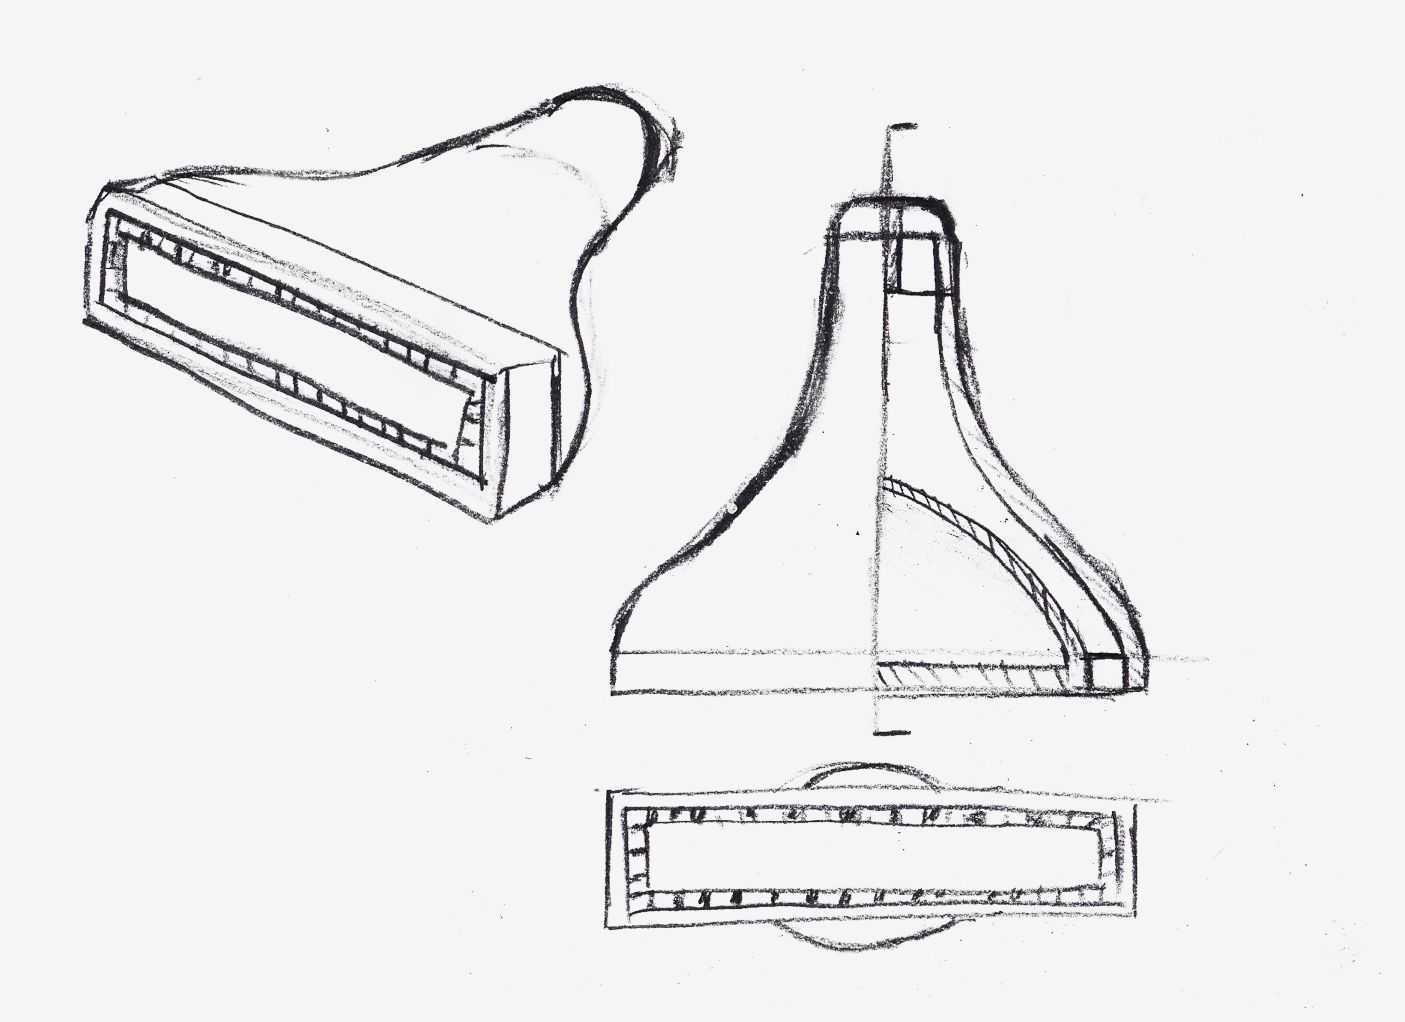
Because of the intensity of the first design, my gut reaction was to lower the velocity of the expelled water by increasing the size of the output nozzle. This would reduce the pressure of the water and as a result reduce the velocity and the intensity of the water going through. To accomplish this I changed the shape and the size of the shower-head to a rectangle with square holes. I had at this point lost confidence in the ability of the printer to make a decent laminar flow shower-head and so I was aiming to try and get at least a usable shower. Towards this end I simply designed what could most easily be a described as a water distributor, splitting the flow into different sections and then pushing them through the aforementioned square holes.
The hardest part of this design was figuring out how to print this in one piece. If I made the piece a hollow form, there would need to be supports inside the print that would both block the flow of water and be near impossible to get out. Some sort of internal supports that would allow for a hollow print but would not block the water flow or need to be removed. To minimize the amount of supports I needed, I basically created an inner shell and and outer shell, connected by several vanes and the exit face that holds the square holes.
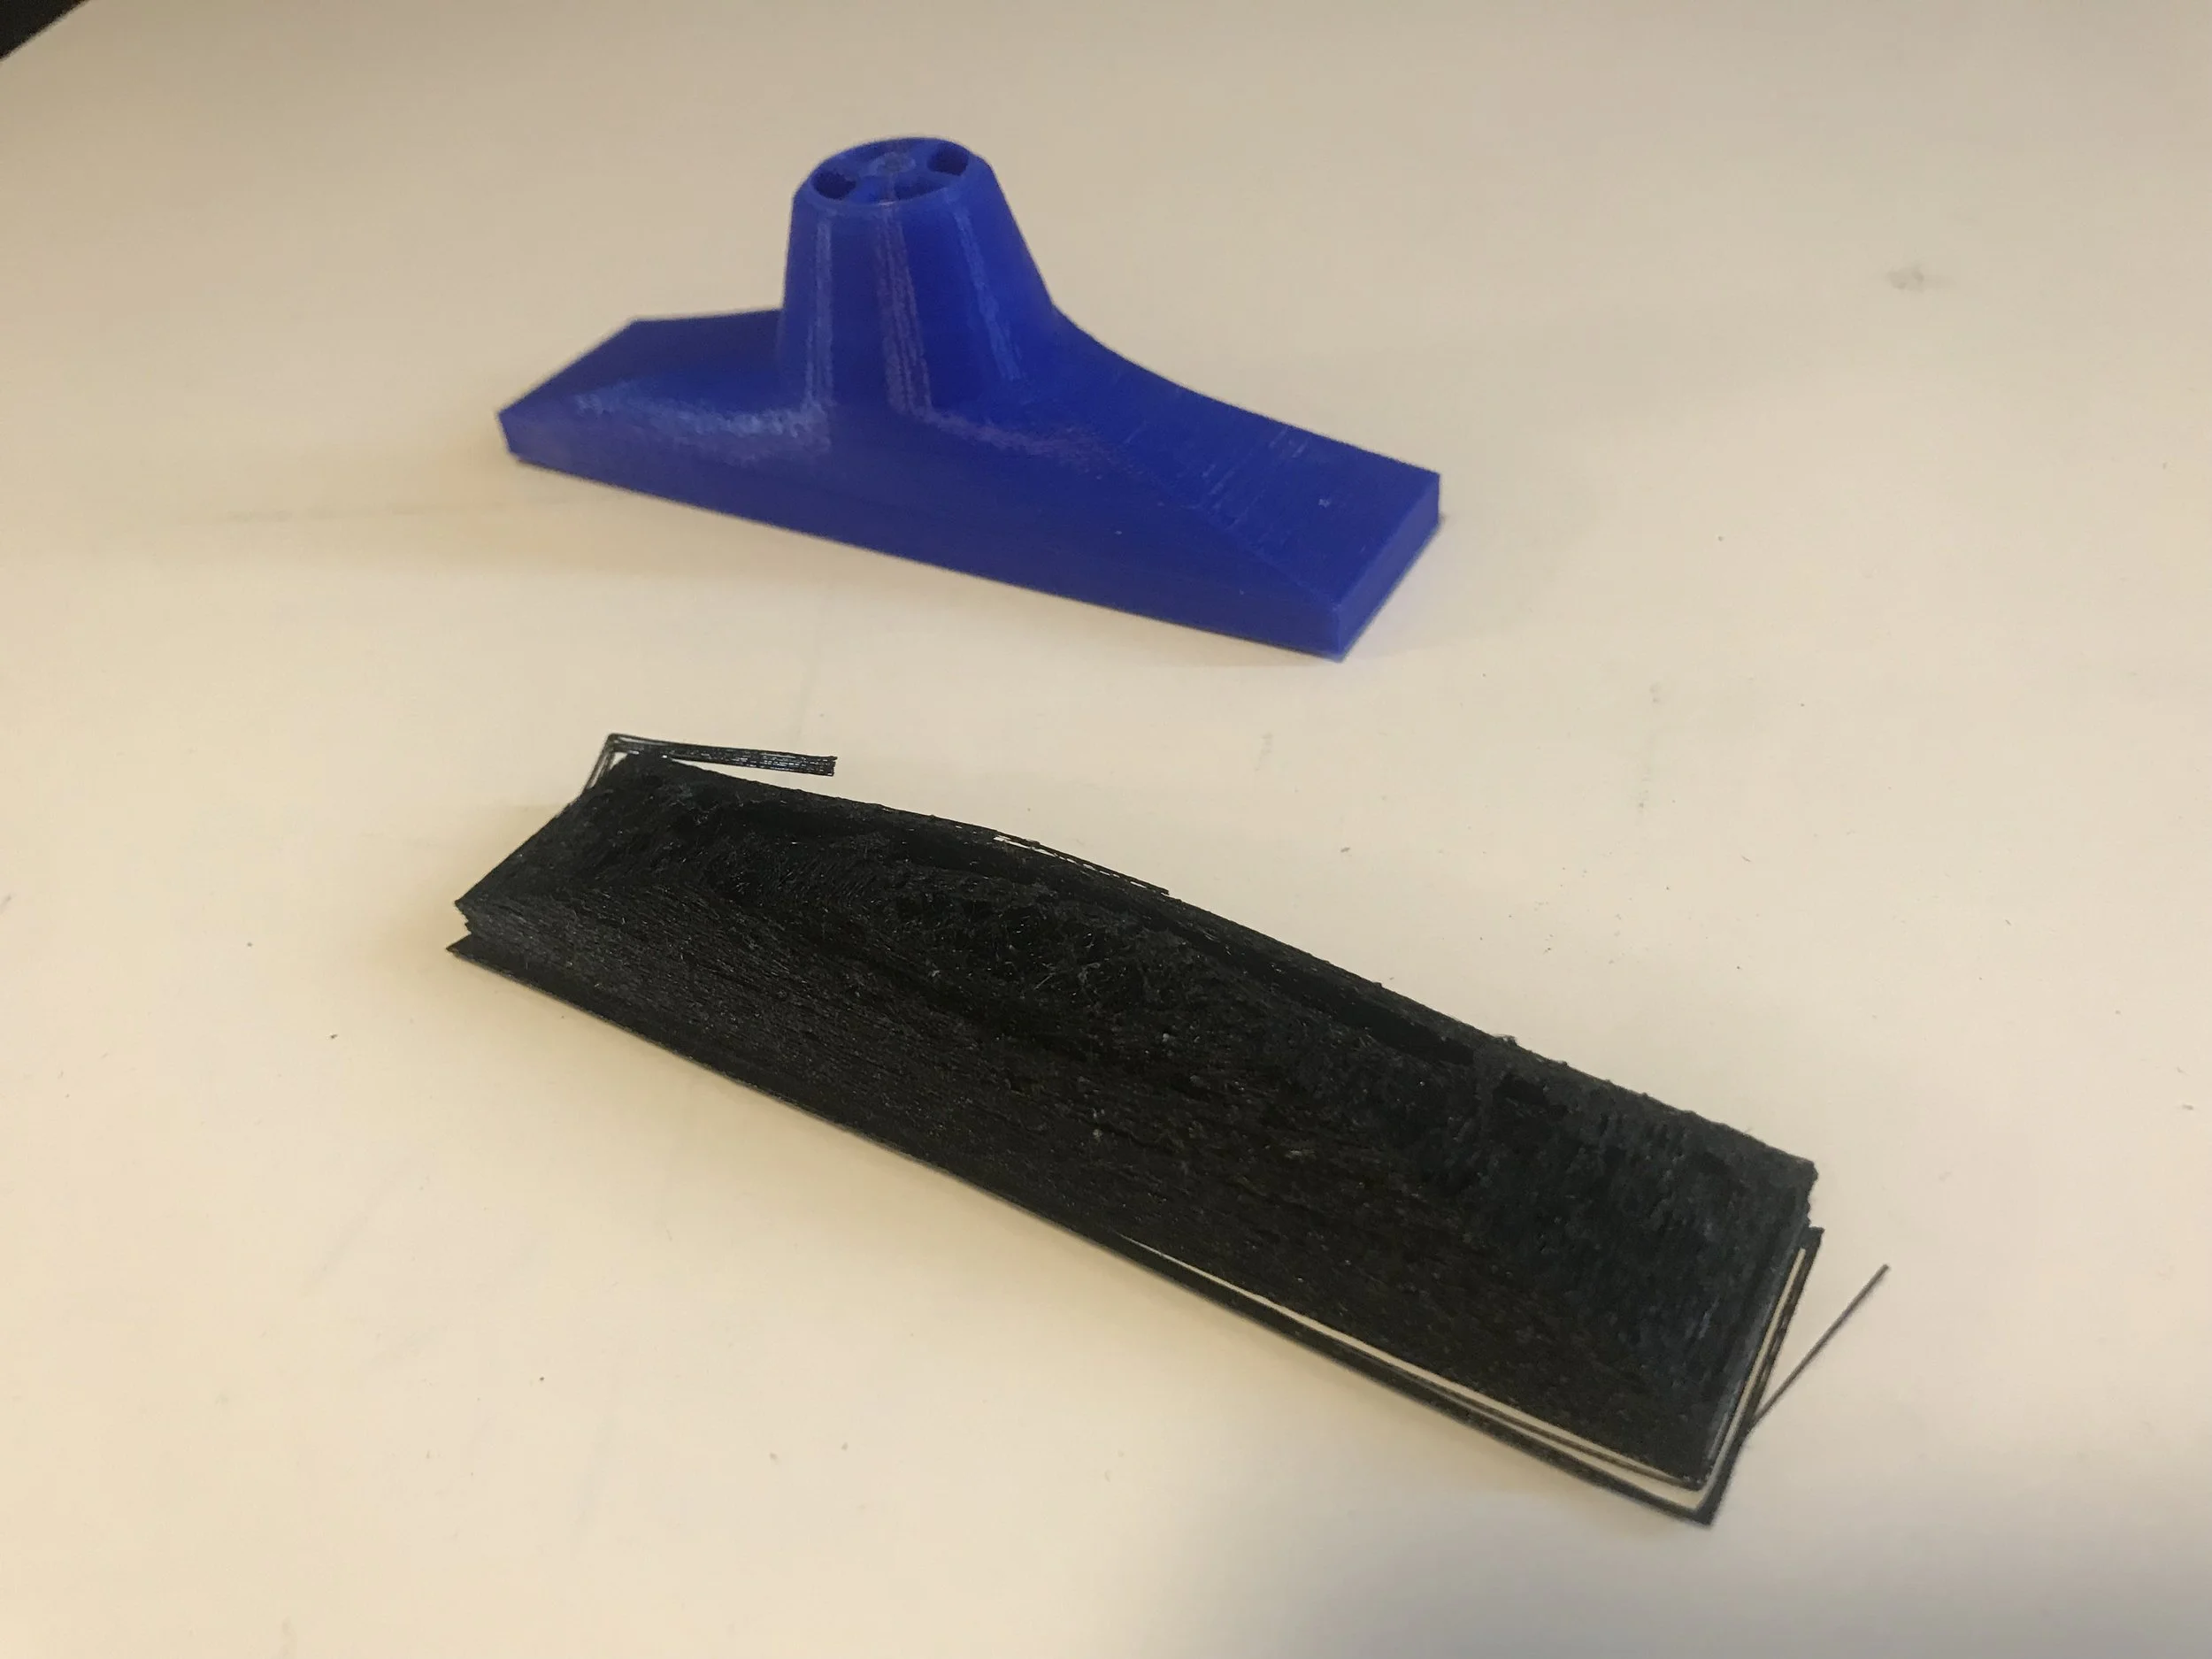
With printing this particular head, I encountered some problems with layer adhesion; how well the individual layers stuck together. This was caused due a clog in the printing nozzle and a misaligned bed; the platform on which the item is is printed onto. Not knowing at the time how to fix it, I took advantage of the facilities at my University and used their 3d printers to print out a nice solid blue shower-head. Sadly the performance of this design was perhaps the worst of all iterations.
The water flow was messy, spraying in every which way when installed. With lower water pressure the water tension would pull the water together into a dribbling mess and so I quickly abandonded this design. High pressure would act more like a random sprinkler. I quickly shelved this one and went back to the drawing board.
Attempt 3
With the lackluster result of the second attempt, I did some more research on how the laminar flow nozzles worked. From my research into videos and how-to guides on the internet I realized that I had not fully understood how the system actually worked. My initial design relied on what essentially amounted to a grouping of several of high pressure nozzles into one unit. The understanding I had at the time was that all I needed to do was to provide a lattice that would reduce the turbulence of the water coming out of the pipes by redirecting the flow in one direction. I imagine I got this impression from the way that many wind tunnels will arrange the airflow prior to their test chambers. A fence of air vanes are put after the main fan and designed to create a more laminar flow in order to better simulate an object moving through the air and not air around an object.

This illustration produced by Larry Cotton was published in Make magazine issue 34 and shows a peanut butter jar laminar nozzle. Sources like this helped me understand better how the technology worked. For his tutorial follow this link:
https://makezine.com/projects/make-32/laminar-flow-water-fountain/
Although this works in wind tunnels, intuition tells me that this doesnt work for a laminar flow water nozzle due to the fact that outside higher end wind tunnel facilities, there is not a need for absolute laminar flow as natural air is rarely if ever truely laminar. This means getting the air to be roughly headed in the same direction in a consitent manner is enough for testing purposes. I am not holding this as fact however as this is just my gut instinct. For a laminar water nozzle, more sections are needed.
I will be giving my own names to parts in this section so they probably will not be called the same thing to what other people may call them. First off is the reception area. This is where the water from the pipe enters the system and the initial pressure and turbulence are relieved. The crossection of this area will be quite large to slow down the water. Often people will put sponges or some other lattice in this area which helps absorb the turbulence as well. The water that flows out of this would be slow moving realatively turbulence free water (until it exited the sponges at least, the water interacting with itself would cause turbulence). The reception area is sometimes followed by another reception area with an even tighter lattice to further reduce the turbulence. It is this reception area is the main part I was missing in my design.
After the pressure and the turbulence have been reduced, the water is pushed through another fence that acts as vanes to direct the flow. In amatur builds, this is acheived through stuffing most of the remaining space with straws pointing towards the open end of the nozzle. These act as the directional vanes that push the water all in one direction. This is what allows the water to flow in a laminar fashion out of the end.
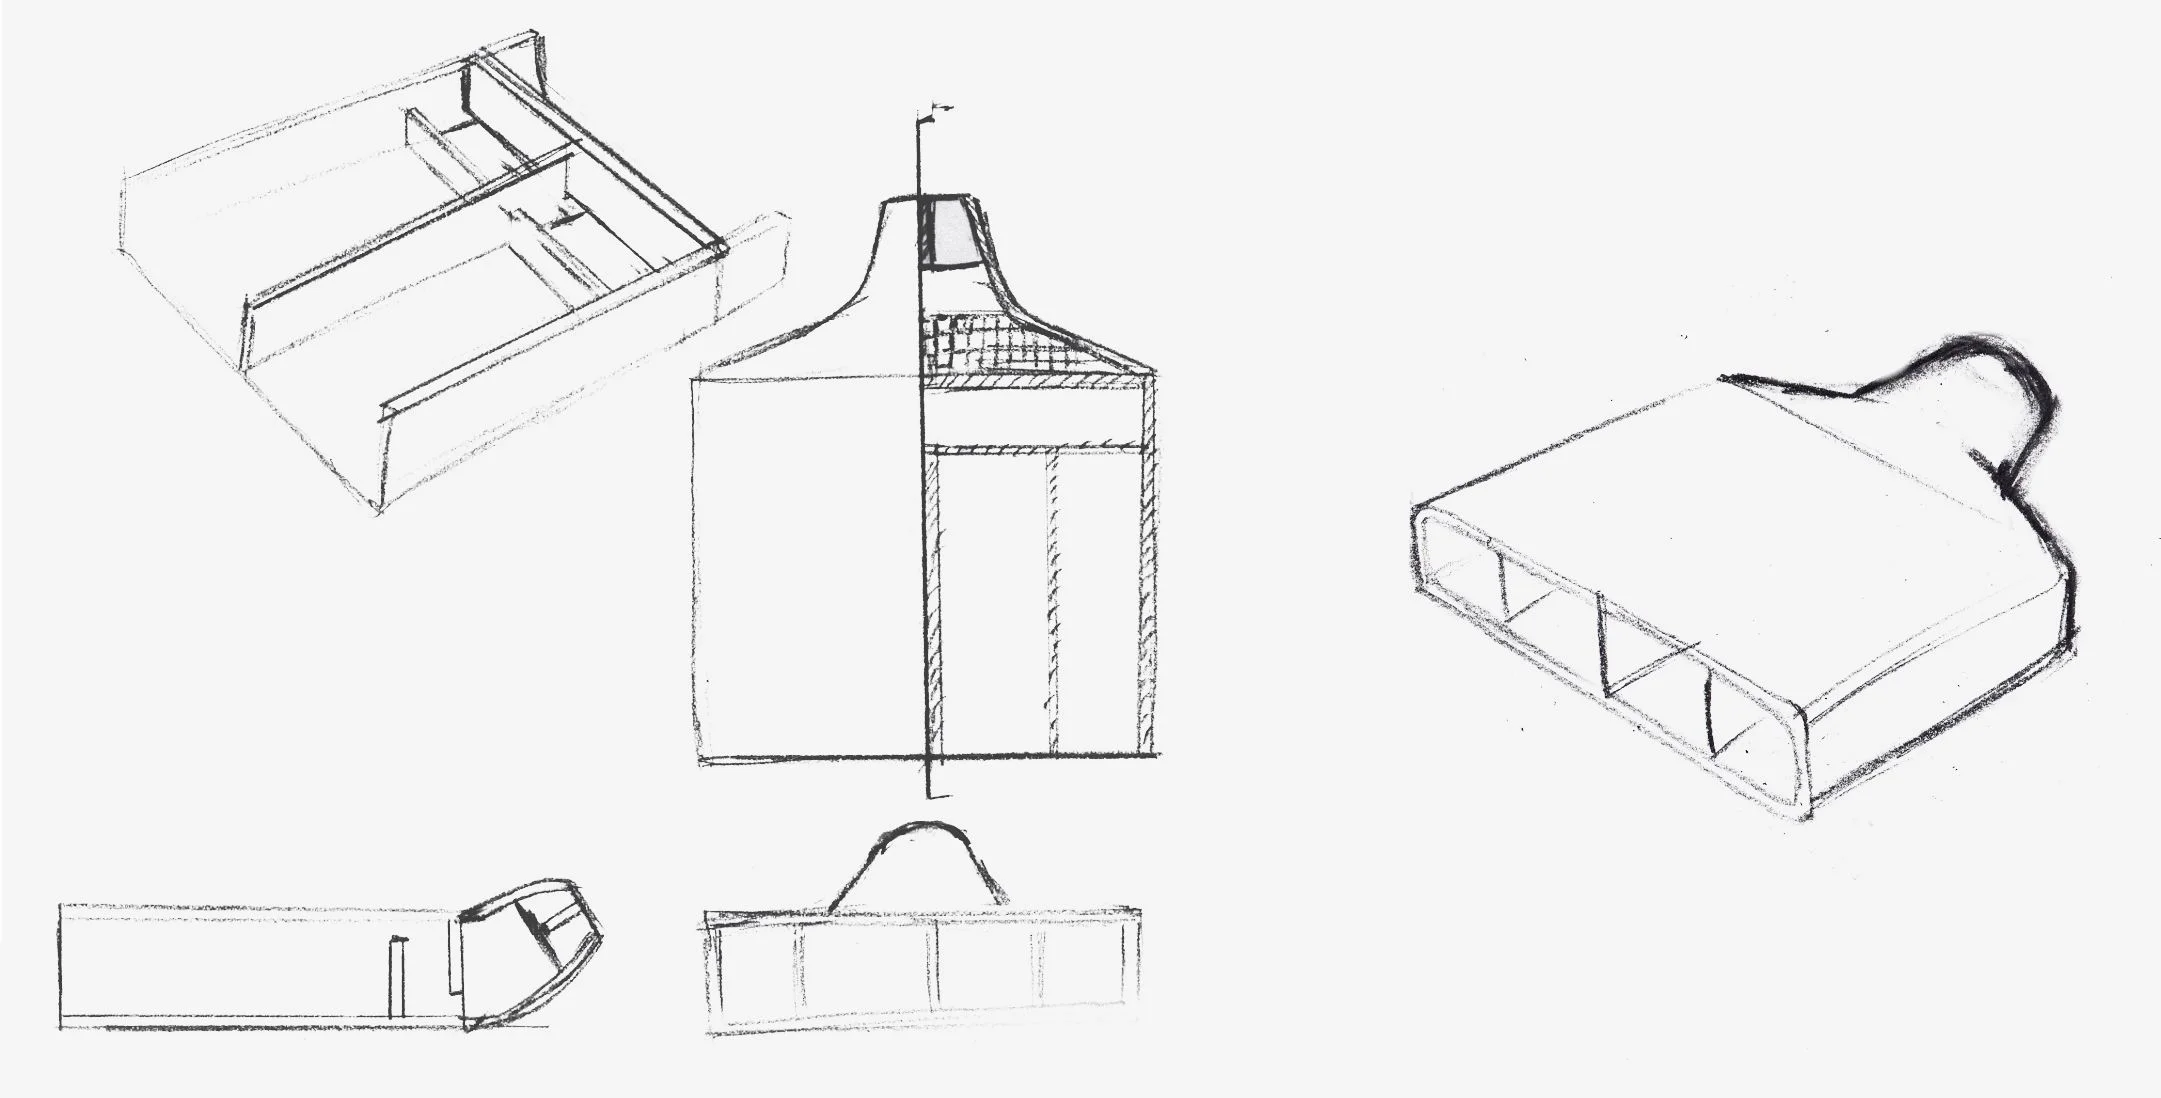
For the third design, I tried to incorporate the findings I made in my subsequent research of laminar flow nozzles. The first change made was that the design was much wider than before and came in three parts. This was due to the limitations of FDM 3D printing; you cant print overhangs and support structures will entail a large portion of your used plastic. The three parts were made up of a connector, a base, and a lid. These were later glued together with expanding Gorilla Glue to fill up any gaps and provide a waterproof seal.
The design itself changed significantly from the previous iteration. Connecting the body of the shower-head to the preexisting shower-head, the connector also served a secondary purpose as an initial turbulence fence and as an initial empty space for the water to fill up and reduce in pressure. The main body was designed to house two additional chambers for the water to fill. To keep water flowing and not simply filling and overflowing into the next section, the inlets and outlets of each were put on opposite sides. You can see what I mean by this in drawing below. This was built in for two reasons. Again, it allowed the water pressure to equalize. As a result the water is allowed to flow without the turbulence that excessive pressure would cause. Second, it helped distribute the water along the length of the shower-head, reducing the risk of one side getting water while the other didn't.


The remainder of the space is basically comprised of the fenced space that is usually filled with straws in normal laminar nozzles. I did not however, fill this area with straws. After initial assembly of the shower-head, I decided to give it a try and mount it. The results in my opinion were awesome. Because of the long rectangular shape of the shower-head, the flow of water came out in flat waterfall-like streams. This was not fully laminar by a long shot due to a lack of the straw vanes and the rough texture of the print, but it turns out this worked to the design's advantage.
When the flow was reduced to the point where the volume of water did not cause turbulence and the flow became somewhat laminar, the water had a tendancy to disperse in an extreme fashion when it hit my upper back. A laminar flow of water hitting a relatively smooth surface at a high angle of attack (aka. perpendicularly or at a sharp angle), instead of the water tension puling the water to the object and soaking it, it will break spread outward in an manner where the water is still flowing laminarly. This creates a disk of water that becomes more domelike as gravity takes hold of it. In the shower, this means more water is on the shower curtain and walls rather than on me. Because the water was slightly turbulent, it allows the flow to break when it hits the skin on my back, meaning a more effective shower.

In the end what resulted was not a laminar flow shower. My discovery in the testing phase of the third iteration that a laminar flow would not actually be well suited to a shower cemented this. What I did end up with was a waterfall effect shower-head. The turbulence and pressure reducing areas served more to spread out the water evenly to allow the water to flow at a constant rate along the width of the shower-head. In the video below, you can see the flow of water taper the further it got from the shower-head. This is due to the surface tension of the water pulling the sides of the flow inward and was to be expected, even in a laminar flow model. I was not upset by this as it allowed a built in variability in the form and intensity of the water flow depending on where the water would hit you. Closer to the top, the water would be softer, whereas lower down the effects of gravity and surface tension concentrated the flow. A plus was that the water was still, for the most part, clear showing that some degree laminar. There was no foaming nor any bubbles in the flow and the water only started to really break apart after falling halfway to the ground.
Conclusion
This small project came about due to a pretty bad shower and some pretty badass new tech. What I initially envisioned as a clear rod of water washing over me turned into a clear-ish waterfall of pure bliss. There are several problems with printing a 3D shower-head, especially when penultimate control of the flow of water is desired. The characteristics of FDM printing causes issues with the flow of water and will cause turbulence. But even if that wasnt an issue, a laminar shower-head proved in the end to be impractical.
In the end, I used this shower-head for about half a year until I moved out of that apartment. And honestly, I do miss it. Perhaps for one of my next projects I'll reiterate on the design and make another one.